
BEESTKEEPING | Royal Queen Rearing & Royal Jelly Kit - Review & How It Works
Jun 05, 2025After five years of discussing various beekeeping topics, queen rearing remained untouched until a company reached out to me about their royal jelly kit. Having extensive experience in queen breeding but hesitant to endorse it for backyard beekeepers, I decided to explore the kit, which claims to simplify the process even for those with limited eyesight. This article will cover unboxing the kit, explaining traditional queen breeding methods, and demonstrating how to use it for queen production and royal jelly harvesting.
Queen Breeding Process
Queen breeding involves transferring larvae, which hatch on day three, into queen cups for feeding with royal jelly by nurse bees in a queenless hive. The queen cells cap on day eight or nine, and the new queens emerge around day 15 or 16. Prior to the queens hatching, it's crucial to separate them into their own hives to ensure survival.
Here's the queen breeding calendar:
- Day 1 - queen lays an egg (nothing required from beekeeper)
- Day 3 - eggs hatches into larvae. this is the day the beekeeper will pick up that day old larva (called grafting) and put it into an upside down queen cup and place these cups in a queenless hive.
- Day 8/9 - Queen cups with grafted larvae are capped and larvae begin pupation stage
- Day 13/14 - queen cups/cells are removed from hive and place into their own hive/split/mating nuc
- Day 15/16 - queens hatch
Watch the Video Instead!
This video explains everything in this article plus more because you can watch me set up the comb box and royal jelly kit.
Challenges in Queen Breeding
Grafting queen larvae poses several challenges for backyard beekeepers. First, it is crucial to have a controlled environment for the process, ensuring the larvae on that frame you are grafting from remain warm and moist. This frame cannot stay out of the hive long. There will be a few nurse bees still on this frame and you do not want to shake this frame, so it is best to do this in an outdoor structure like a barn, shed, or garage – do not bring it into your house. Additionally, differentiating between the ideal day-old larvae and older ones can be tricky, leading to the risk of grafting older larvae which can develop into weaker queens. Getting the larva onto the grafting tool along with the pool of royal jelly and not harming it while picking it up or placing it into the cell is a skill you get better at with practice. Having a dark space with a table and headlamp help quite a bit.
When I tried grafting for the first time, I had no one to teach me what to do. I just found a queen rearing book at my place of employment and gave it a go. The first time I did it, quite a few things went wrong and I accidentally killed quite a few larvae trying to graft, but in the end, I had 8 queen bees that hatched.
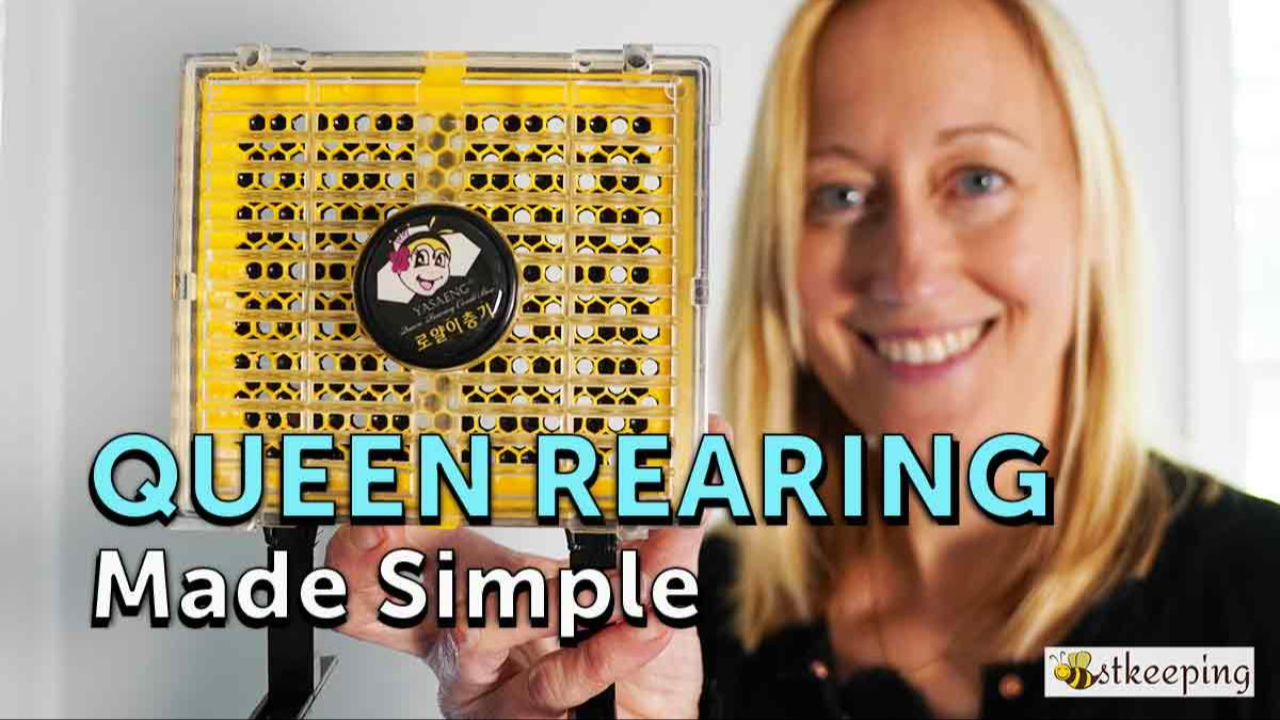
Beestkeeping Queen Rearing & Royal Jelly Kit
Overview
The Beestkeeping queen rearing kit includes 3 nursery frames designed to hold queen cups, a comb box which takes out the need to graft larvae, numerous plastic queen cages for ease of use, and additional tools for royal jelly harvesting. It arrived quickly from Korea and is accompanied by non-English instructions. However, there are very helpful English resources on the website as well as a video tutorial explaining how to use the kit in a step-by-step process.
How to Use the Beestkeeping Queen Rearing & Royal Jelly Kit
Step 1 - Prepare Comb Box
Begin by taking the comb box and inserting plugs into the back. Open the front so that the clear plastic queen excluder comes off and lightly spray the yellow foundation with sugar syrup and close back up. Place this comb box into the brood box, in the center of the brood frames, hanging upside down between two frames using the black legs. Leave this in the hive for a couple of days for the bees to clean and build additional comb off the foundation.
Step 2 - Introduce the Queen
Prepare the hive with only two frames of honey, take the black circle plug out of the queen excluder and place the queen inside the comb box. Put the plug back into the hole, so the queen cannot escape. This will allow the queen to lay eggs while monitoring her progress. Place the comb box with queen in between two frames of honey in a nuc box (or full size box with follower board to limit size of hive. Remove all other frames of honey and brood, but shake the bees off the brood frames into the hive with the queen before removing.
TIP! This should be done first thing in the morning.
Step 3 - Spot Eggs
The key to this kit working is to keep an eye on the hive. In the late afternoon, check on the comb box to see if there are eggs in the cells. If the queen has laid eggs in the comb box, release the queen from the box. Put the box back into the hive and put the brood frames back in the hive as well. Leave comb box in the hive for 3 days.
Note! It is very important you know when the eggs were laid and remove the queen as soon as needed.
Step 4 - Day 3/No Graft Day
On the day 3 of the queen laying eggs in the comb box, these eggs will hatch into larvae. Instead of grafting the larvae out of their cells, you will simply pull the plugs with eggs in them out of the back of the comb box and put them into a queen cup. All the queen cups are hung upside down from the bars of a nursery frame.
Do not put more than 30 queen cups into a single hive. The nurse bees may not be able to feed more than 30 queen cells at one time and queens can hatch weak and unhealthy.
This nursery frame in put into a hive with nurse bees and pollen, but no queen bee.
Add sugar syrup to ensure hive has enough resources to make their queens.
Step 5 - Separate Queens
On day 15/16, the queens with hatch and kill each other if left in one hive. As early as day 10, but as late as day 14, you should separte your queens and put them in their own hive. This can be a split you made from your hives or you can make small mating nucs just for the mating process and sell the queen bees. A nice alternative, is that this kit comes with a large bag of queen cages. There is a hook at the top of the cage where you can attach the queen cups if you'd like your queens to hatch in the same hive, just put each one in their own queen cage first and they won't be able to harm each other after hatching. However, you will hae to separte them soon so they cna mate.
In Summary
The Beestkeeping Royal Queen Rearing Kit & Royal Jelly kit is a great way to try your hand at queen breeding without killing a bunch of larvae in the process. It makes harvesting royal jelly very easy and the kit is comparable to price to other queen rearing kits on the market. An advantage this kit has over other kits is that it comes with 3 fully assembled nursery frames for the queen cells (other ones comes with just the bar to attach to a wooden frame you would have to cut notches into), queen cages, powdered sugar to make plugs for the queen cages and caps for storing cells if you are looking to harvest royal jelly. While not essential for beginners, queen rearing can be a very enjoyable experience and allows the beekeeper to quickly build their apiary without spending a fortune purchasing queen bees.
You can purchase this kit as well as learn more about it and how to use it at beestkeeping.com. Click here to go straight to the purchase page for the kit!
Want to learn more about beekeeping?
Join our newsletter for blog updates, beekeeping videos, sales and contests.


