
How I Overwinter a Beehive In Pennsylvania
Oct 25, 2025Winter is the most challenging time of year for honeybees, especially in regions like southeastern Pennsylvania where temperatures can plummet below freezing for extended periods. Unlike other insects that hibernate or migrate, honeybees remain active throughout winter, generating heat by vibrating their flight muscles and forming a tight cluster to maintain warmth. The success of your colony's survival depends entirely on proper preparation during the fall months.
The three primary threats to winter bee survival are cold temperatures, excessive moisture, and starvation. While bees can handle cold remarkably well when properly clustered, moisture accumulation inside the hive can be deadly. Condensation dripping onto the cluster chills the bees and can lead to disease. Additionally, colonies need adequate food stores—typically 35+ pounds of honey—to fuel their heat generation throughout winter.
When to Start Winterizing
In southeastern Pennsylvania, I begin winterization preparations in late September, before nighttime temperatures consistently drop below 50°F. This timing is crucial because you need to complete your work while bees are still active enough to adjust to changes but before they've formed their tight winter cluster.
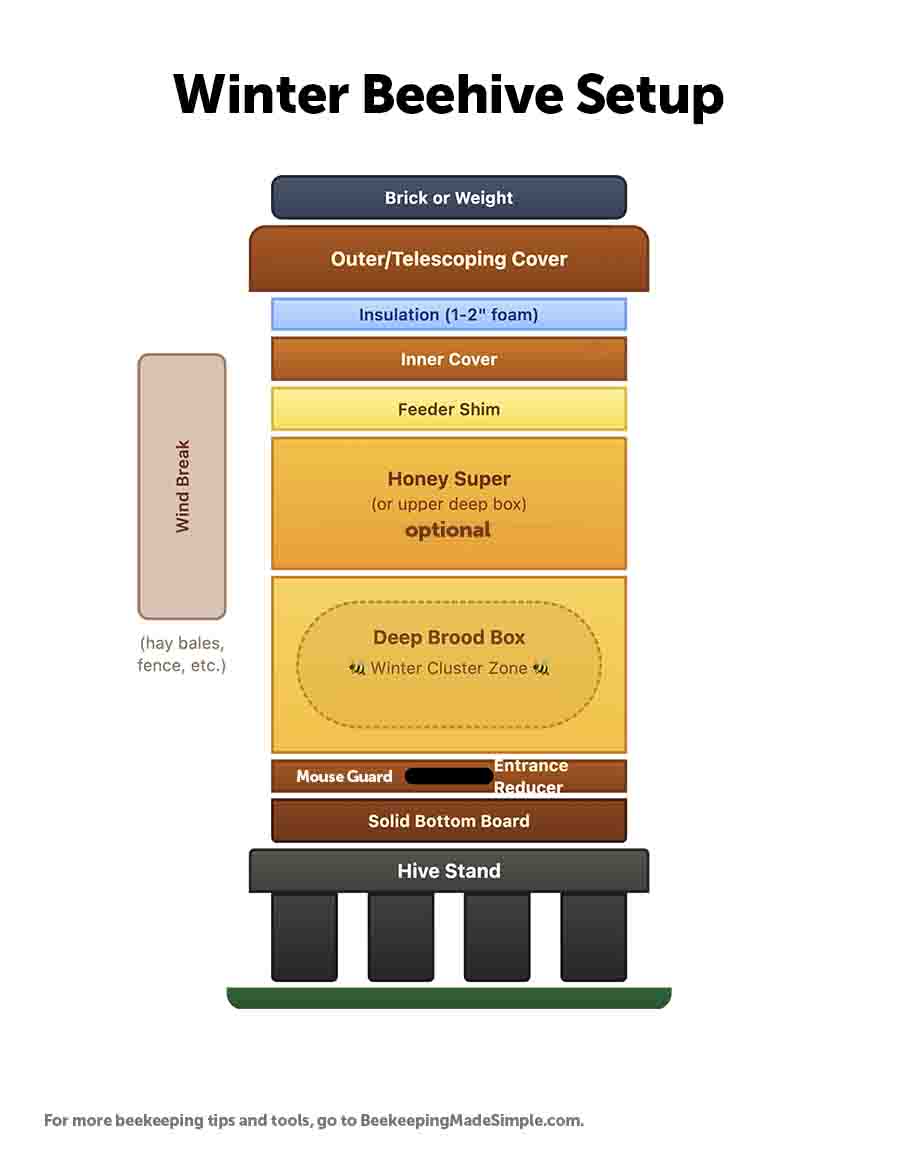
Winter Beehive Setup - Complete Assembly
- Outer cover with weight
- Top insulation (1-2" foam)
- Inner cover (notch up)
- Feeder shim
- Brood box with bee cluster
- Honey stores (35+ lbs depending on your location)
- Entrance reducer (2" opening)
- Metal mouse guard
- Solid bottom board
- Sturdy hive stand with legs
- Wind break (on prevailing wind side)
Northern: Add full insulation, wraps
SE Pennsylvania: As shown (moderate)
Southern: Minimal prep, focus on ventilation & adequate food as well as space to prevent swarming and small hive beetle infestations
Step 1: Hive Inspection and Assessment
An early fall inspection is critical. Choose a warm day (above 70°F) that is at least 4 weeks before temperatures in the daytime will be going below 65F and work quickly to assess your colony's winter readiness. Keep in mind that bees and wasps will start robbing a hive that has been open too long and your bees will be more defensive that usual. You're looking for three key factors: a healthy queen (evidenced by brood pattern, though brood will be diminishing), adequate population (the cluster should cover at least 6 frames), and sufficient food stores.
To assess food stores, heft the hive from the back. A properly provisioned hive should feel heavy—a full deep frame of capped honey weighs approximately 5-7 pounds. You need roughly know how many pounds of honey your bees will need for winter survival in your region. If frames feel light, you'll need to supplement with feeding before cold weather sets in. Remove any empty frames and consolidate bees into fewer boxes if necessary, ensuring the cluster has enough bodies to maintain warmth.
If your inspection reveals insufficient stores, immediate feeding is essential. In early fall, heavy sugar syrup (2 parts sugar to 1 part water) works well because bees can still process and cap the liquid. However, as temperatures drop, and get below 65F, you will want to take the liquid syrup out of the hive.
Step 2: Entrance Reduction for Defense
Installing an entrance reducer serves multiple critical purposes. First, it helps the colony defend against mice, which seek warm shelter and can devastate a hive by building nests, eating comb, and disturbing the cluster. Second, a reduced entrance minimizes cold drafts while still allowing adequate ventilation. Third, it gives the smaller winter colony a manageable space to guard.
In early fall (or even late summer if neded) I like to reduce the entrance to about 4 inches wide. This is to keep robbing to a minimum but only should be done if bees are not bearding and temperatures are not above 80F.
Once temperatures are getting below 70F and we are getting ready to prepare the hive for winter, I place an additional piece of wood over the entrace to reduce it to 2" wide. This is sufficient for dead bee removal and ventilation while being easily defensible. This also allows me the option to open the hive up to 4" while clearing out the bottom board and then put it back when I'm done.
Some beekeepers debate whether to include an upper entrance for winter ventilation. While we're using a setup without an upper entrance, upper entrances do offer advantages in very cold climates by allowing moisture to escape and providing an emergency exit if the bottom entrance becomes blocked by snow or dead bees. If you choose to add an upper entrance, drill a 3/4-inch hole in the upper deep box or use a notched inner cover. I choose to not use an upper entrance because it allows warm air to escape. Although too muhc moisture is not good for the bees, they do need moisture in the hive and with an upper entrance blocked, warm air stays in, preventing the bees from having to use up as much energy to produce heat, thus eating less food.
Don't forget the mouse guard! Placing a metal mouse guard over the reduced entrance will prevent mice from making a warm beehive their home for winter. This should be done before night time temperatures go below 50F. However, it can be taken off once winter has set in and mice have already built their winter nest. Make sure this guard is made of metal because mice can chew through wood. One can be purchased from beekeeping supply companies or you can make one from 1/2" hardware cloth.
Step 3: Bottom Board Configuration
The choice between solid and screened bottom boards significantly impacts winter hive conditions. Solid bottom boards, which we're using in this setup, retain more heat and create a more stable thermal environment. This is particularly beneficial in southeastern Pennsylvania's variable winter weather, where temperatures can swing dramatically.
However, if you're using a screened bottom board, you'll need to close it for winter. Install the solid insert board that came with your screen, or create a temporary closure using coroplast (corrugated plastic) cut to fit. This modification prevents excessive heat loss through the floor while maintaining the screen's benefits for the rest of the year. In northern states with severe winters, solid bottom boards are strongly preferred, while milder southern regions can sometimes leave screens open year-round. If you would like a small bit of ventilation for your bees, but don't want your hive to lose all that warmth by having an upper entrance, leaving a 1/2" gap of screen on the bottom of your hive is a great secondary form of ventilation for your bees.
Step 4: Moisture Management—The Critical Factor
If there's one aspect of winter preparation that beginners often overlook, it's moisture management. Here's the paradox: bees need to consume water during the winter, which is in the hive in the form of condensation, but they do not want this condensation dripping onto them. Thousands of bees clustering together generate significant humidity. When warm, moist air rises and hits a cold inner cover, and condensation forms. These cold water droplets falling back onto the cluster can chill bees to death.
The solution lies in ensuring your outer cover has a 1-2" piece of insulation so that the warm air hitting the lid is not forming condensaiton and dripping onto the bees, but forming on the walls of the hive and frames of honey for the bees to access. You also place sugar above the frames of bees which will further absorb condensation forming at the top of the hive.
Step 5: The Outside of the Hive
If temperatures are already dipping below 65F in the daytime, you should tape up cracks and holes in the beehive with duct tape. If it's still warm out, the bees may propolize it themselves and this step might not be necessary.
Step 6: Wind Protection
Wind chill significantly impacts hive temperature. A hive facing prevailing winter winds can lose substantial heat, forcing bees to consume more honey to maintain cluster temperature. Ideally, position hives with entrances facing southeast or south, away from prevailing northwest winds. If relocation isn't feasible, create windbreaks using snow fencing, hay bales, or natural features like buildings and evergreen trees.
However, ensure windbreaks don't trap excessive moisture or block winter sunlight, which provides valuable warmth on sunny days. Maintain at least 3-4 feet of clearance in front of the hive entrance. Some beekeepers wrap hives with black tar paper, which absorbs solar heat while providing wind protection—a dual-benefit solution.
Step 7: Emergency Feed
Once it is below 55F, that is when I add my back up feed to the hive. This is in the form of a candy board, sugar bricks or fondant. this emergency feed is a hard cane sugar placed above the bees in case they run out of honey. It's best to put this on the hive once temperatures get cooler out to prevent robbing, ants from getting to it or the cluster from coming up to eat it prematurely.
Step 8: Final External Preparations
Complete your winterization with these crucial external steps. First, secure your top cover with a heavy rock or ratchet strap—winter winds can blow covers off, exposing the colony. Second, ensure the hive has a slight forward tilt (about 1 inch lower in front) to prevent water from pooling inside and to help dead bees roll out the entrance.
Clear vegetation and debris from around the hive entrance to maintain air circulation and discourage mice. Check that your hive stand is sturdy and level side-to-side. Finally, make note of your setup in a beekeeping journal—what preparations you made, colony strength, and food store estimates. This documentation proves invaluable for learning what works in your specific location.
Winter Monitoring and Maintenance
Once winterized, resist the urge to open your hive. Every inspection during cold weather disrupts the cluster and costs the colony valuable resources. However, you should perform periodic external checks. After snowfalls, ensure entrances remain clear but don't brush away all snow—it provides insulation. On warmer days (above 45°F), watch for cleansing flights, which indicate colony health.
Hefting the hive from the back every 4-6 weeks lets you monitor food stores without opening boxes. If the hive feels noticeably lighter, emergency feeding may be necessary. Place candy boards or fondant directly on top bars during a mild day, working quickly to minimize cold exposure. If you hear quiet humming when placing your ear against the hive, that's a good sign—the colony is alive and clustered.
Regional Variations and Adaptations
Understanding that beekeeping is inherently local helps you adapt these guidelines to your situation. Northern beekeepers in states with sustained sub-zero temperatures often wrap hives completely, use insulation boards on all sides, and employ wind barriers. They may also combine colonies to ensure sufficient cluster size for heat generation.
Southern beekeepers face different challenges—shorter winters but potentially more unpredictable. Colonies may break cluster during warm spells, consuming stores more rapidly and potentially starting brood too early. They typically use minimal insulation, focus on ventilation, and monitor food stores more frequently due to extended brood rearing.
In southeastern Pennsylvania, we occupy a middle ground. Our winters are cold enough to require serious preparation but not so severe as to demand extreme measures. This makes proper moisture management and adequate food stores our highest priorities, with moderate insulation and wind protection as supporting strategies.
Common Beginner Mistakes to Avoid
First-time winterizers often make predictable errors. Over-insulating without adequate ventilation creates deadly moisture problems. Opening hives for frequent "just checking" inspections breaks the cluster and wastes bee energy. Feeding too late in the season means bees can't process syrup before cold sets in. Starting with too many boxes forces the small winter cluster to heat excessive space.
Another common mistake is assuming all colonies need identical preparation. Stronger colonies with abundant stores can handle less intervention. Weaker colonies might benefit from combining with another weak hive to create a single strong unit. Pay attention to each colony's specific needs rather than applying a one-size-fits-all approach.
Conclusion: Setting Your Bees Up for Success
Successful winter beekeeping in southeastern Pennsylvania comes down to three core principles: ensure adequate food stores (60-90 pounds of honey), manage moisture through proper ventilation, and provide appropriate wind protection. These fundamentals matter far more than expensive equipment or complicated techniques.
Remember that winterization isn't a single event but a process that begins with proper colony management throughout the active season. Strong colonies entering fall with young, healthy bees and ample resources have the best survival odds. Your fall preparations simply provide the finishing touches that help these bees make it through to spring's first flowers.
As you gain experience, you'll develop intuition for what works in your specific microclimate and with your management style. Keep notes, learn from both successes and losses, and connect with local beekeepers through clubs and associations. Winter losses are part of beekeeping, but proper preparation dramatically improves your odds. With the techniques outlined in this guide, you're giving your bees their best chance at survival, setting the stage for thriving colonies when spring arrives.
Ready to Learn More?
Sign up for online beekeeping course, Beekeeping for Beginners. Click here to learn more and sign up for a free, 30 day trial.
Want to learn more about beekeeping?
Join our newsletter for blog updates, beekeeping videos, sales and contests.


